
반응형
1. THREE.JS 기본 구조
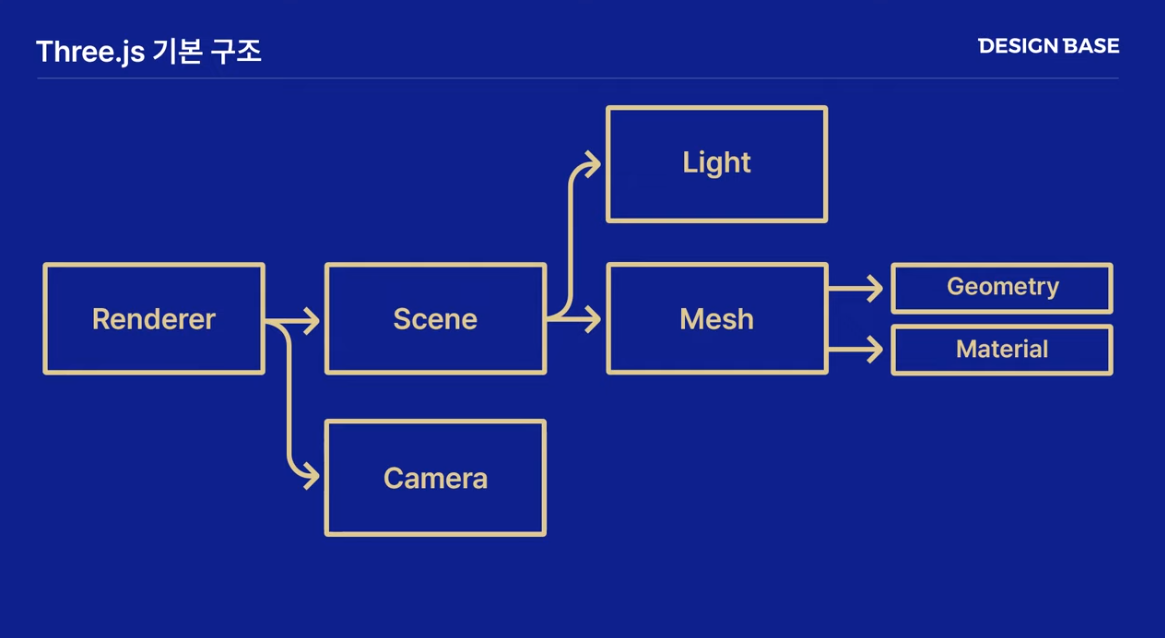
가장 기본이 되는 구조는 Render, Scene, Camera이다.
장면을 만들어서 그 안에 3D 오브젝트를 넣고, 그걸 렌더를 통해서 html 파일 안에 보여주는 순서이다.
1) Render
Scene과 Camera의 객체 데이터를 넘겨 받아서 화면 안에 이미지로 그려주는 역할(렌더링)을 한다.
2) Scene
특정한 장면 안에 geometry, mesh, 3D object들이 여러 개가 있을 수 있다.
빛, 안개 등 다양한 요소도 모두 포함하고 있다.
3) Camera
앞 전에 셋팅해놓은 Scene에 담긴 3D 공간들에 대한 정보 데이터를 카메라로 특정 위치를 비춰서 거기 안에 담긴 부분만 렌더러에게 넘기는 역할을 한다. 카메라의 시야각, 시작과 끝지점, 위치를 조절할 수 있다.
2. three.js 기본 규격
import * as THREE from 'three'

import {
  WEBGL
} from './webgl'

if (WEBGL.isWebGLAvailable()) {

  // 장면
  const scene = new THREE.Scene();

  // 카메라
  const camera = new THREE.PerspectiveCamera(75, window.innerWidth / window.innerHeight, 0.1, 1000);

  // 렌더러
  const renderer = new THREE.WebGLRenderer();
  renderer.setSize(window.innerWidth, window.innerHeight);

  document.body.appendChild(renderer.domElement);

  renderer.render(scene, camera);

} else {
  var warning = WEBGL.getWebGLErrorMessage();
  document.body.appendChild(warning);
}

까만배경의 윈도우 크기만큼 기본 규격이 그려진다.
3. 배경색 바꾸기
[부분 코드]
scene.background = new THREE.Color(0x004fff);배경색을 바꾸기 위해 THREE.Color를 사용해줍니다.
[전체 코드]
import * as THREE from 'three'

import {
  WEBGL
} from './webgl'

if (WEBGL.isWebGLAvailable()) {


  // 장면
  const scene = new THREE.Scene();
  scene.background = new THREE.Color(0x004fff);

  // 카메라
  const camera = new THREE.PerspectiveCamera(75, window.innerWidth / window.innerHeight, 0.1, 1000);

  // 렌더러
  const renderer = new THREE.WebGLRenderer();
  renderer.setSize(window.innerWidth, window.innerHeight);

  document.body.appendChild(renderer.domElement);

  renderer.render(scene, camera);

} else {
  var warning = WEBGL.getWebGLErrorMessage();
  document.body.appendChild(warning);
}
4. HTML 특정 ID에 삽입하는 방법
render를 적용하는 방식은 2가지가 있다.
지금까지 해 온 방식은 아래와 같다.
1) document.body에다가 바로 적용하는 방법
document.body.appendChild(renderer.domElement); //1) document.body에다가 바로 적용하는 방법
2) 특정 id에다가 적용하는 방법
[html]
<!doctype html>
<html lang="en">
  <head>
    <meta charset="utf-8">
    <meta name="viewport" content="width=device-width, initial-scale=1, shrink-to-fit=no">
    <link rel="icon" href="static/favicon.ico" type="image/x-icon">
    <link rel="stylesheet" href="static/styles/main.css">
    <title>Three.JS-Webpack Boilerplate</title>
  </head>
  <body>

    <canvas id="ex-03"></canvas>


    <script src="public/bundle.js"></script>
  </body>
</html>
[ex-03.js]
import * as THREE from 'three'

import {
  WEBGL
} from './webgl'

if (WEBGL.isWebGLAvailable()) {


  // 장면
  const scene = new THREE.Scene();
  scene.background = new THREE.Color(0x004fff);

  // 카메라
  const camera = new THREE.PerspectiveCamera(75, window.innerWidth / window.innerHeight, 0.1, 1000);


  // 캔버스 -> 렌더러
  const canvas = document.querySelector("#ex-03");
  const renderer = new THREE.WebGLRenderer({canvas});
  renderer.setSize(window.innerWidth, 500);

  document.body.appendChild(renderer.domElement); //1) document.body에다가 바로 적용하는 방법


  //애니메이션 하려면 다음과 같이 표현해줘야 함
  function render(time){
    time *= 0.001;

    // cube.rotation.x=time;
    // cube.rotation.y=time;

    renderer.render(scene, camera);

    requestAnimationFrame(render);

  }

  requestAnimationFrame(render);

} else {
  var warning = WEBGL.getWebGLErrorMessage();
  document.body.appendChild(warning);
}
반응형
'FE > Three.js' 카테고리의 다른 글
| Three.js 6일차 (카메라) (0) | 2023.10.18 |
|---|---|
| Three.js 5일차 (Texture/질감) (0) | 2023.10.18 |
| Three.js 4일차 (Material) (0) | 2023.10.18 |
| Three.js 3일차 (Geometry) (0) | 2023.10.17 |
| Three.js 1일차 (설치 및 import) (0) | 2023.10.16 |